Friday, October 16, 2015

52-Weeks of Book Binding, Journals and more...

Week 42
Rubber Band Book


The idea for this book came from Kari McKnight-Holbrook's DVD "Backgrounds To Bindings".


Kari shows you how to create a journal using one sheet of 22" X 30" watercolor paper into a beautifully colored book for embellishing, journaling, collaging or to use in any way that brings out your creative spirit.


You start off with a 22" X 30" piece of watercolor paper and start layering by first adding texture, which can be old book pages, collage papers or anything else you have on hand that you would like to use.

Then you start adding color.  You can pick 2-3 colors, but I would say no more than three.  You can stencil, stamp, print, etc. on your paper.  I first started with the color blue, ranging from light to dark,

and then added my second color, purple, ranging from light to dark.  You can use any color combination, but be careful not to add colors that are opposite on the colorwheel from each other, otherwise you will end up with mud.  If you really like these colors together, then wait until one color dries before adding the next.


I folded the paper in half so that the two halves are now 15" X 22" (DO NOT TEAR JUST FOLD).  Now tear your paper into thirds, lengthwise.  Now you have three sheets that are 30" long.  Fold each side toward the center fold line and glue.  Punch holes in your book using a Japanese hole punch.  


Using small rubber bands, loop one end into one hold and the other end into the other hold. 


I used a paint brush to use to go through the loops, but you can use a pencil, chopstick, etc. Finish looping the rubber bands to the remaining holes.
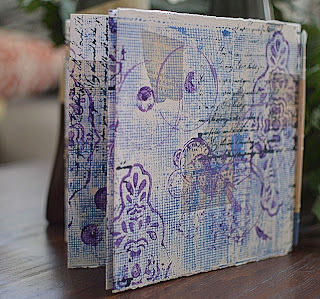
Viola!  Your book is done!

For more information on Kari McKnight-Holbrook, or more inspirations, check out her website here.

Saturday, October 10, 2015

52-Weeks of Book Binding, Journals and more...

Week #41

This weeks post is about the "Journal Cover" and not so much about the book.
I have been wanting to make a tall skinny journal, a clock journal and a Steampunk journal.  So, this time around, I created all three into one journal.

Front Cover
The book is 10-1/2" X 4", which takes care of the tall skinny part of the journal.  I added all sorts of gadgets and gears and a little of this and a little of that.  So, that took care of the Steampunk part of the journal.  I added a real working clock part to the front cover and that takes care of the clock part of the journal.  So with all of the above, I combined the three journals I wanted to make into one.
 
I cut two pieces of chipboard 10-1/2" X 4".  I painted the covers first with white gesso.  Using stencils I added textured pasted and then spritz different colors on top.  I added Diva Inka Silver and glued everything down with E-6000.  For the pages, I used Strathmore Tonal Gray paper, which worked well with the cover.

Back Cover
On the back cover, I added just a few embellishments.  I used the Codex binding technique to bind my pages to together and then glued the front and back pages to the covers.

There you have it.  Three journals in one!

Wednesday, October 7, 2015

Creating Mandalas: How to Draw & Create Mandala Art

My Book "Creating Mandalas: How to Draw & Create Mandala Art" is being feature in the Cloth Paper Scissors Website. 

Example from the book.
In the book you can explore all the different types of mandalas, practice creating your own, and step-by-step instructions on both beginner and expert level patterns to further develope and challene your skills.  You will get tips for creative designs, patterns, and coloring techniques with more than 40 examples to learn from.

You can go to the Cloth Paper Scissors website and pre-order the book.

Tuesday, October 6, 2015

Zentangle Classes

Basic Zentangles 101

I taught a Basic Zentangle class at Monica's Quilt and Bead Creations on Saturday, October 3rd.

These ladies did a fabulous job on their tiles.  
They were inquisitive (always a good thing), anxious to learn and most importantly lots of fun.

They were able to complete three tiles.  They created a basic Zentangle tile, a mono-tangle and one combined to patterns that flowed into each other.  I think they all did a great job.

Friday, October 2, 2015

52-Weeks of Book Binding, Journals and more...

Week 40
"My Tall Bird Book"

This week's post was a matter of taking a lot of loose papers and putting them together to create this journal.  

I had some watercolor paper, Strathmore Bristol Paper and Artagain sheets of varying sizes.  I took all of the papers and cut them to fit the size of my cover.  The cover is from a 12" X 12" piece of matt board I had.

Watercolor Paper
Strathmore Bristol Paper (right)
Artagain (right)
The stencil I used was a stencil I had purchased from Stencil Girl Products, called "Tall Birds". Hence the name for my journal.  I used a white pen to trace the birds and title my journal.


I have to admit, this is not one of my favorite books, but I was able to use up some papers that were lying around.  Now it can be put to some good use.  Since there is watercolor paper, bristol paper and Artagain, it will make a good study book, I think.

Friday, September 25, 2015

52-Weeks of Book Binding, Journals and more...


Week 39
Chalkboard Mini File Folder Album

This week I took a regular everyday Manila File Folder and turned it into a Mini Album.  
I found the directions on how to make this here.

I first folded the folder according to the directions given, then I painted the outside with Chalkboard Paint and around the inside edges of the folder.


After the paint dried, I started to decorate my Album.   I glued chevron scrapbook paper on the inside, cut some tags and decorated the outside of the pockets.  I also added a bit of bling.  The tags were left blank to add either photos and/or journaling.

While refolding the folder and working with it adding embellishments, some of the chalkboard paint rubbed off, giving it a distress look.


I decorated the back cover and left the two inside pages blank.  I thought it would be nice to have something blank to write on using real chalk.

Back Cover

Tuesday, September 22, 2015

Journal

"Fall Leaf"

Since doing fall leaves at the ARTbar, I have been in a Fall Leaf sort of mood.  

Today, I decided to draw and color a Fall Leaf in my journal.  Reading the "Artist Way" Book many years ago had started me journaling ever since.  

When I bought my new journal book "Tesla Journal", 

I decided to combine a bit of art along with the journaling.  Every other side of the left pages are either a half page or a full page.  The right side has lines for journaling.  Sometimes I do not feel up to doing art, so on left side I will draw lines to journal on as well.

But, today, the fall leaf called out to me.

I drew the leaf in pen and colored it in with watercolor pencils.  Instead of using water to blend the colors, I used matte medium instead.  Using the matte medium helps seal the colors so they will not rub off and since it is not as liquidy as water, it did not bleed through to the other side of the page.

As you can see, I continued the lines from the right side to the left for my journaling.  I took the picture before journaling, but now with the written words around one side of the leaf, it has, I think, enhanced the leaf like a shadow.